You can always learn something new.

I have been sewing since I was very small. My mother had me work on simple projects sitting next to her while she was sewing. I did learn early on that it is important to take your time, sew carefully and neatly. And if a seam doesn’t come out just right, it is worth your time and effort to tear it out and do it over.

I was in a sewing class at Custom Home Furnishing Academy a couple of summers ago. It was fun to learn how to make window treatments I had not tried yet and learn better ways to make the treatments I was familiar with. As a group of ladies that had a lot of sewing experience but different experience, we found ourselves sharing little tricks and shortcuts to make our work simpler and more efficient.

seam ripper

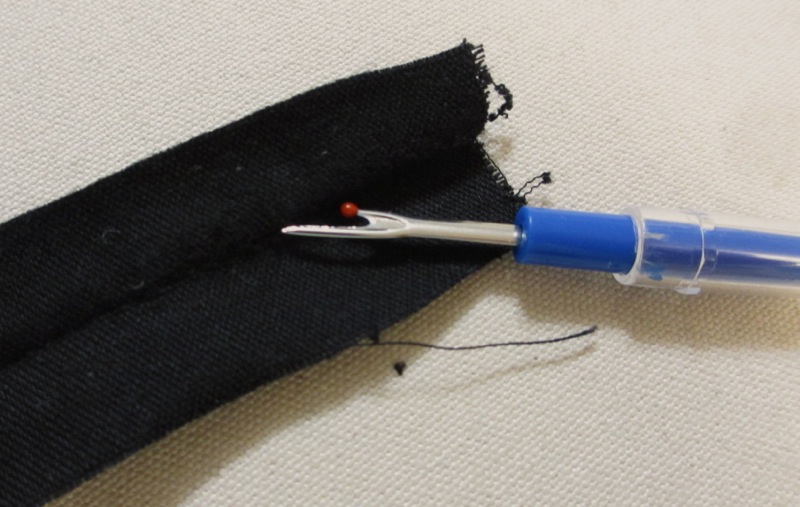
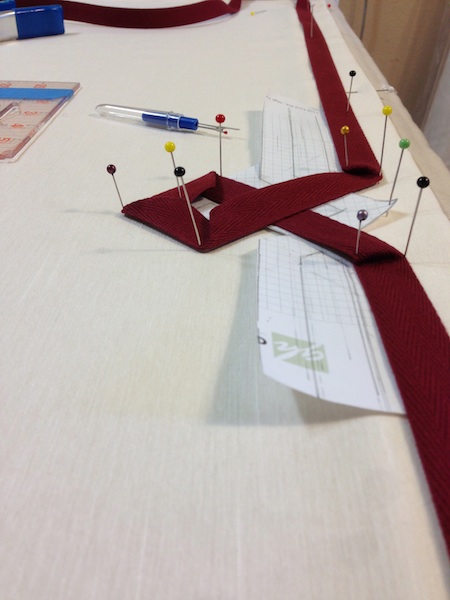
One such tip was how to use a seam ripper. For many years I have stuck the sharp end of the tool under each stich and cut that stitch. Some times I could rip out a seam a little easier by cutting every 4th or 5th stitch. It still took along time to rip out a whole seam. Our instructor asked – what is the red tip for on a seam ripper? She showed us how to flip over the tool, run the red tip just under the stitches and rip down a whole seam in one fell swoop. The covered tip keeps the ripper from tearing or cutting your fabric, it slides neatly under the stitches cutting them easily as you push the tool down the seam.

rippingNow I don’t have to worry about basting a seam, ripping it out and restitching. If there is a seam put in the wrong place it is quick and easy to fix. Sometimes it is the simplest thing that can make your sewing experience easier and more fun.

Don’t be afraid to try a new project or new tool. Do you have a favorite tip or trick? I would love to hear from you.


A handful of tools


When starting any new project you need a handful of tools. Here are a few basics that every good sewing basket should have. Pins – buy good ones and not small pins. I like pins with a glass head and that are 1 7/8″ long. This is because most of my sewing is with decorator fabric and I need large sturdy pins. But I have also found that larger pins are less fussy to deal with, don’t bend too easily and the glass heads don’t melt when you iron over them. A magnetic pin bowl saves spilling pins on the floor and makes for quick clean up when the pins are scattered all over your table. The pretty blue magnetic pin cushion sells for $9-15.00 at the local fabric store. The metal pin bowl has a stronger magnet, works just as well and I spent about $3.00 at Harbor Freight Tools. pinsScissors – a good pair of sharp scissors to cut fabric and fabric only is a must. I like the Fiskars scissors with the spring. It is a personal preference. Some people invest in large sharp scissors that can be sharpened on a regular basis and last for generations. I have yet to invest in a pair. I like the lighter weight scissors and replace them when they get too banged up to be useful.

A second small pair of scissors is very helpful. They are best for cutting threads at your machine and hand sewing.

Needles- you will need good hand sewing needles. To start out, buy a package with different sizes, try them out find a size you are comfortable with using. You will also need a variety of sewing machine needles. Your fabric and needles should match for each project. More on that later.

Seam ripper – you will have to take out stitches. I have told students that just like writing is rewriting, sewing can mean ripping it out and resewing.

Tape Measure – you actually need several kinds of measuring tools. I use a tape measure like to one in the picture to measure people or for quick reference. I have several wide plastic rulers in different sizes to use with my cutting mat, but they also get used to check that things are square and measure hems. I have a simple 6″ metal ruler, a seam gauge and for draperies 25 ft tape measure.

Tailor’s chalk – I started using Tailor’s chalk in marking fabric for draperies, but I found it is also handy in making small marks on fabric for skirts and dresses. It is an easy way to mark pleats, darts, dots that need to match up or a new longer hemline. There are other handy marking pens available too. Again, try several and use your favorite. toolsThis list could go on a long time, but I will end with investing in a good iron. I like an iron that shuts off automatically, one that gets good and hot and creates a lot of steam. I don’t like it when they spit, leak or drip rusty water on my fabric. This Rowenta works well for now.ironSo gather up some basic tools and put them in a drawer or basket near your sewing machine. It is easier to sit down to sew when your tools are handy. Save up those fabric store coupons to shop for the pieces you are missing. Have fun.

Sewing Geek

It is official. I am a sewing geek. My family and I spent a day last weekend visiting the Museum of Flight in Seattle. It was more interesting than I expected. It was a very large place with so many airplanes, parts, gadgets, exhibits, explanations, things to touch, try and play with.

Museum of Flight
Museum of Flight

While my family was enjoying the history, cockpits, games and demonstrations, IMG_1844

I was in awe of the fabrics in the place. The earliest planes and gliders were made with canvas. Military flight suits of course were fabric and somebody had to sew them together, but the details of construction were amazing. IMG_1845IMG_1834

Why were they made to lace up in so many places? Why did they use French seams on the shoulder? IMG_1836What kind of fabric is this or what is it coated with? IMG_1838

The Space Shuttle Trainer cargo bay was completely lined with a type of canvas with a lot  of velcro and buttons. IMG_1839

Living in space takes many specialized tools and systems. So how do you keep your toothbrush from floating around the space station? IMG_1842You sew a tool belt with individual elastic holders for all your toiletry items. IMG_1843

Weight limits in space are also a constant consideration. How do you make a light weight organized tool box? with fabric of course. IMG_1841

I walked around from display to display marveling at the designers, technicians, and sewers that created such practical and beautiful items. It would be fun to hear their story some day.


Threading your machine

When you are just learning to sew there seems to be so much to learn at once. That is one reason why it is good to keep your machine handbook nearby. You also have to take time to practice each skill as it comes along. Threading your machine is a great place to start. Read the instructions carefully, thread yourmachine, try a few stitches to see if  you did it right, unthread your machine and start over. After you do this 3 or 4 times it becomes easier and more natural.

threading

But I know that many of you may have weeks or months between sewing sessions and it can be hard to re-learn this every time you sit down to sew. When I learned to sew on different kinds of industrial sewing machines learning to thread each one was a big challenge. Even now it can be very time consuming to get them threaded correctly, especially my serger.

threading knot

Here is a trick I learned to save time and frustration when I want to change thread color: tie the new thread to the old and pull it through.

pulling through

Even with a portable machine you can keep your machine threaded when you put it away. Just cut the thread close to the spool and leave the length of thread in the machine. The next time you start to sew or whenever you want to change thread colors, tie a knot between the old the thread and the new, pull the old thread completely through the machine. Many times you can pull it all the way through the needle.

new color

Now your machine is threaded with a new spool or new color. You are ready to start a project or try practice stitches on real fabric. Have fun.

sewing in a straight line

I was walking past my neighbor’s house a few days ago. She was sitting on her porch enjoying the spring weather with a friend and her grandson. We took a few minutes to catch up on what was happening in our families when somehow sewing was mentioned. “You can sew?” she asked. I told her yes. She went on to tell me how she had a new machine, had intended to take lessons but was still a little intimidated. I reassured her that sewing was not as complicated or scary as she imagined. She had learned to set up her machine and thread it, but needed a simple way or place to start sewing. I told her my mother had me start on lined paper.

When you first begin to sew, controlling the speed and direction of your stitches is the first thing to conquer. Set up your machine, but don’t thread it. Leave the bobbin thread out also. Start with a basic sewing needle and a piece of lined paper. Practice sewing over the lines trying to stay on the line as best you can. Control the speed as you go. Start out slow and speed up as your stitches become more accurate.

When my children had a hard time controlling the foot pedal and keeping it slow and steady, I rolled a piece of batting and stuffed it under the pedal. This way they could push hard, but the pedal would not go all the way down and go too fast.

Once you feel you can follow a straight line accurately, you can then practice on another sheet of paper where you have drawn some curvy lines or large circles.

Before you start to practice on fabric, replace your needle with a new sharp needle. Save the old one and mark it, it may come in handy later.

sewing practice Have fun.

Curtains By Design